Key Takeaways
- macOS Sequoia public beta allows testing of new features before the fall release.
- Window tiling in macOS Sequoia can streamline window management.
- Window tiling can be expedited with keyboard shortcuts.
macOS Sequoia is finally out in public beta, letting anyone install, test, and provide feedback on pre-released features before becoming publicly available this fall. In addition to Apple Intelligence, macOS Sequoia brings several awesome new features that I’m having fun testing and can’t wait to see officially released.
Window tiling is one feature that particularly interested me. I’m a long-time user of Magnet, having purchased it from the Mac App Store years ago. Magnet is a popular window manager that allows quick and easy window placement by dragging to certain trigger areas or with keyboard shortcuts. Window management is a significant feature for people looking to streamline their macOS experience by quickly placing windows side-by-side, full-screen, and any other placement combinations.
Apple calls window management window tiling, and it’s enabled by default upon installing macOS Sequoia. After Microsoft Windows had this feature for years, Apple finally released something similar with macOS Sequoia. In fact, I wrote a comparison piece to see if macOS’s native window tiling can replace Magnet. Let’s look deeper at window tiling in macOS Sequoia and how you can create and customize window tiling keyboard shortcuts.
Related
Here’s how iPhone mirroring works in macOS Sequoia
With its latest macOS update, Apple aims to more tightly integrate the Mac and the iPhone with new Continuity features.
How to use window tiling in macOS Sequoia
The green button
Pocket-lint
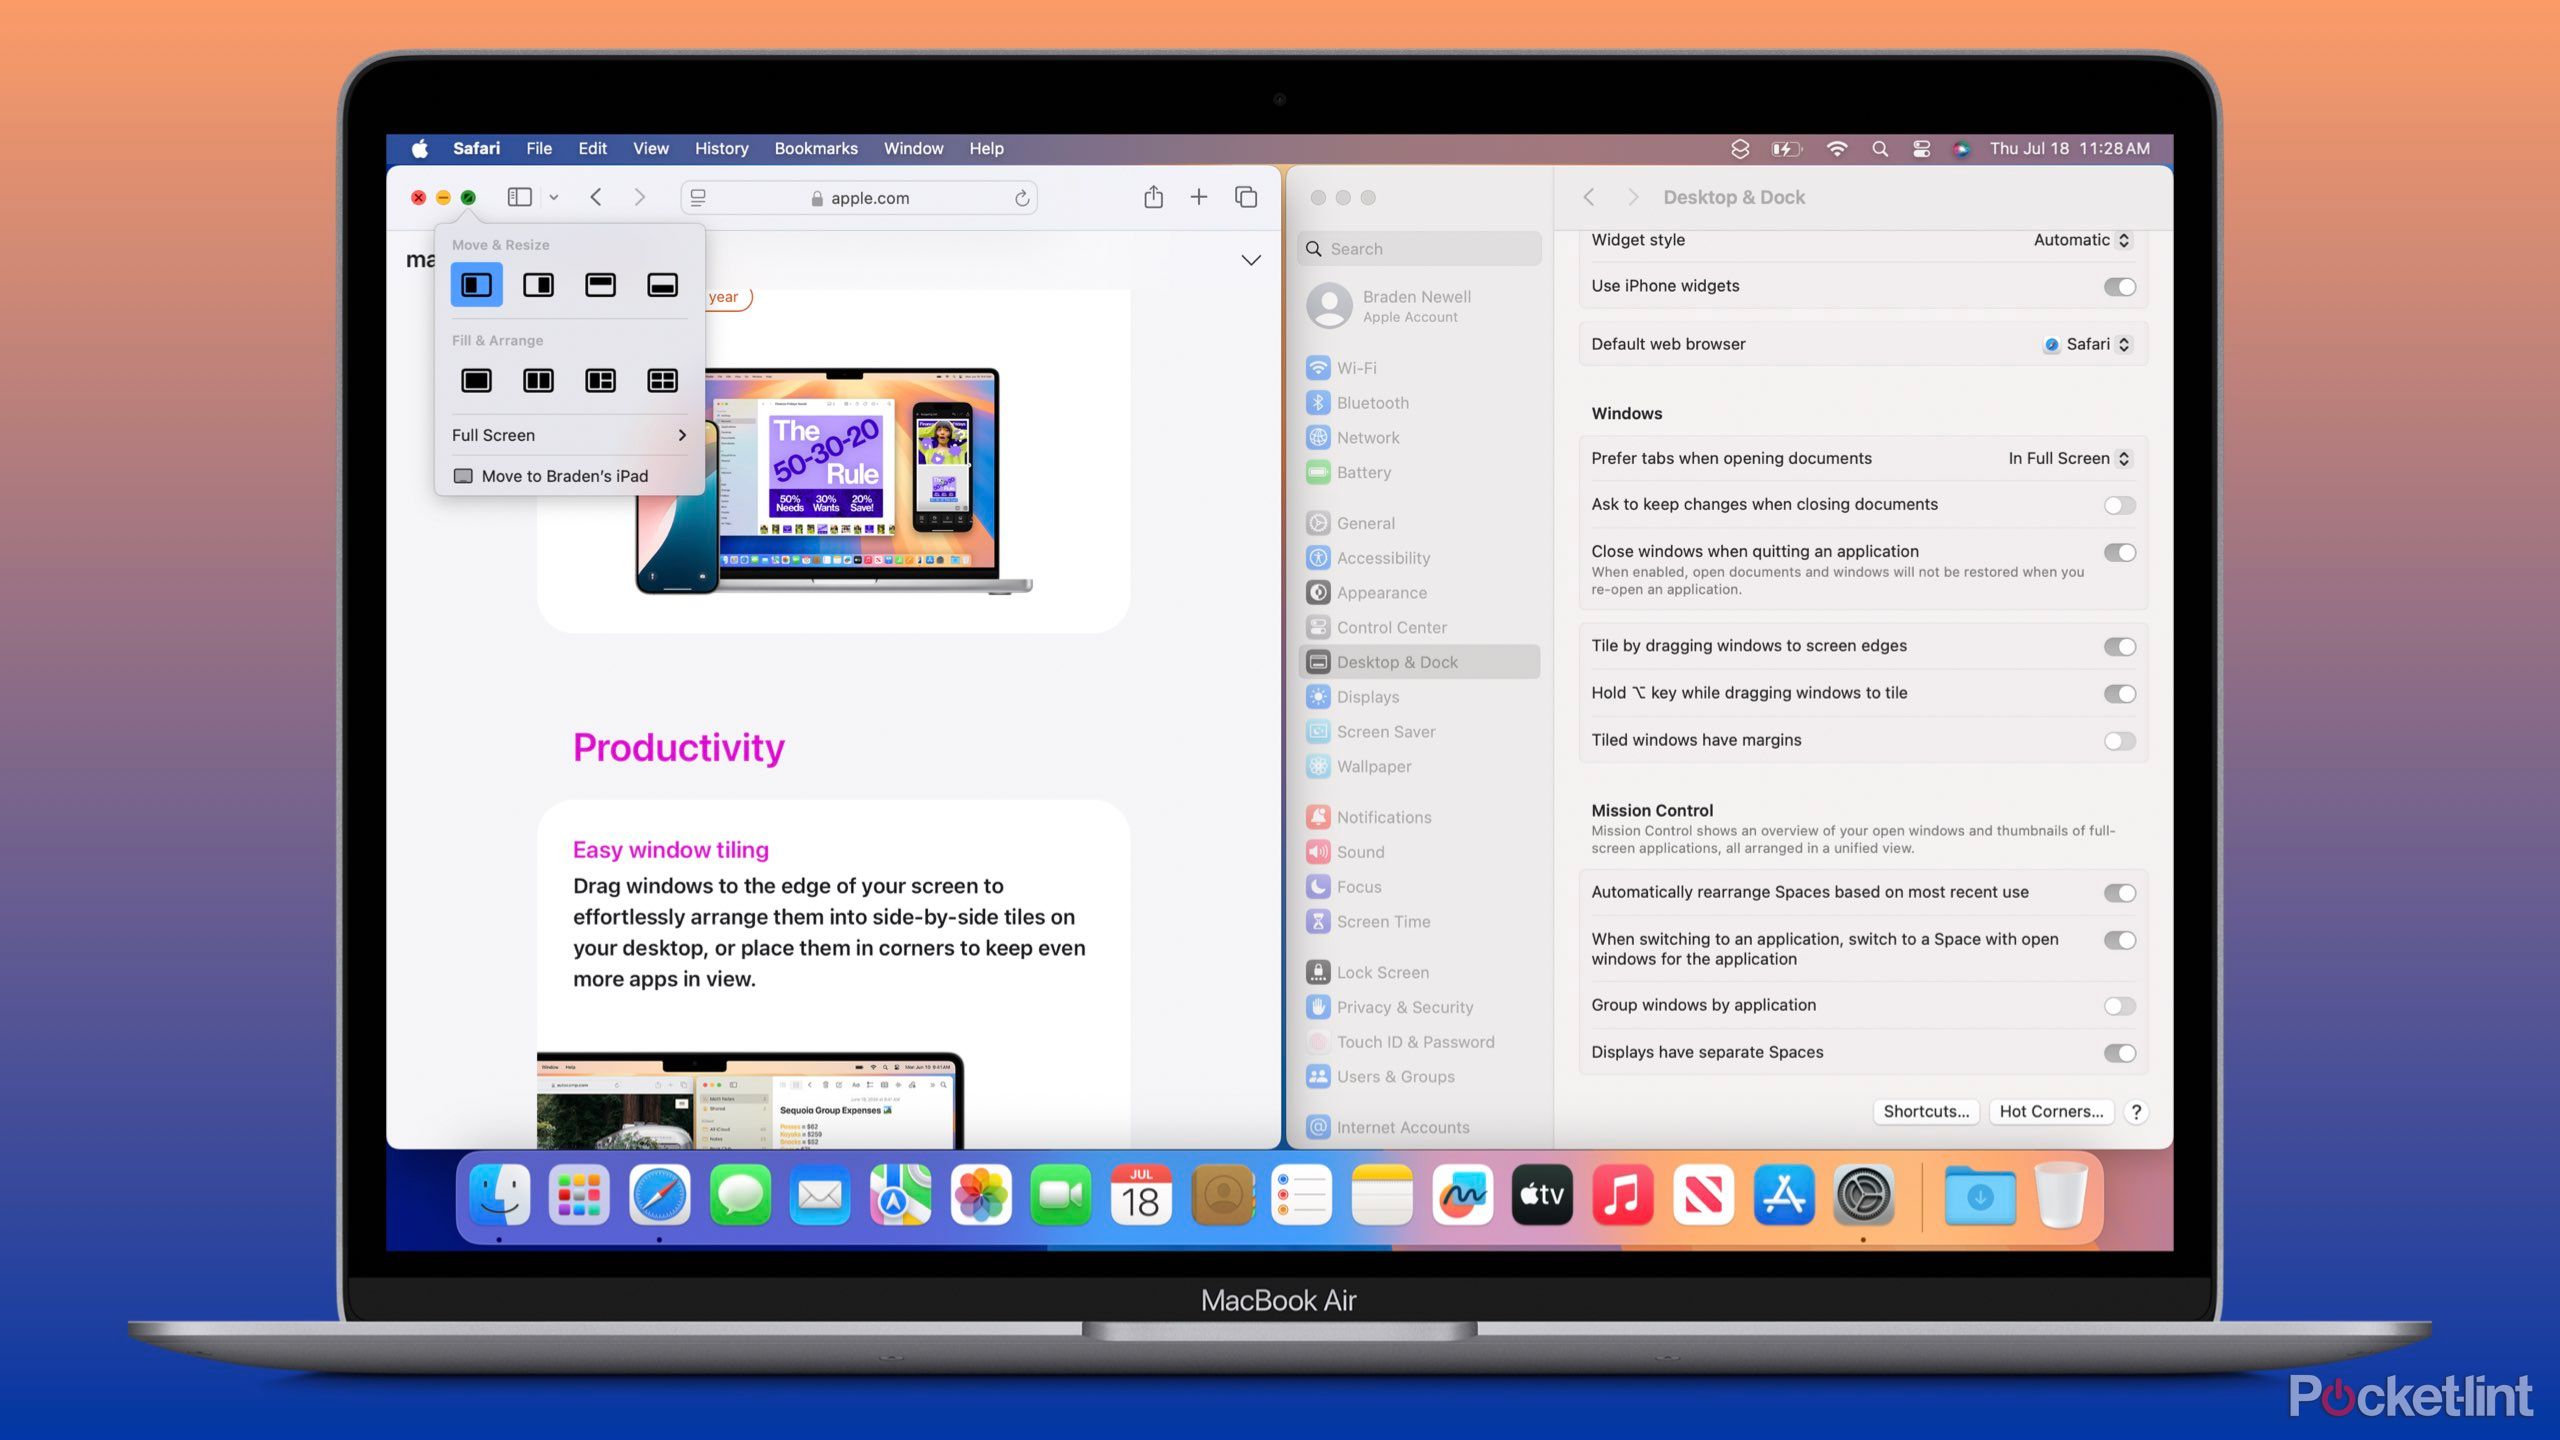
When using any app in macOS, hover the pointer over the green button in the top left corner, also called the full-screen button. A menu will appear with four options under Move & Resize and another four under Fill & Arrange.
When selecting a placement option under Move & Resize, the currently selected window adjusts half of the display, whether that be the top, bottom, left, or right half. Selecting an option under Fill & Arrange can rearrange the selected app to take up the entire display or place multiple apps side-by-side, one-half and two quadrants, or four quadrants.
Dragging and Option key
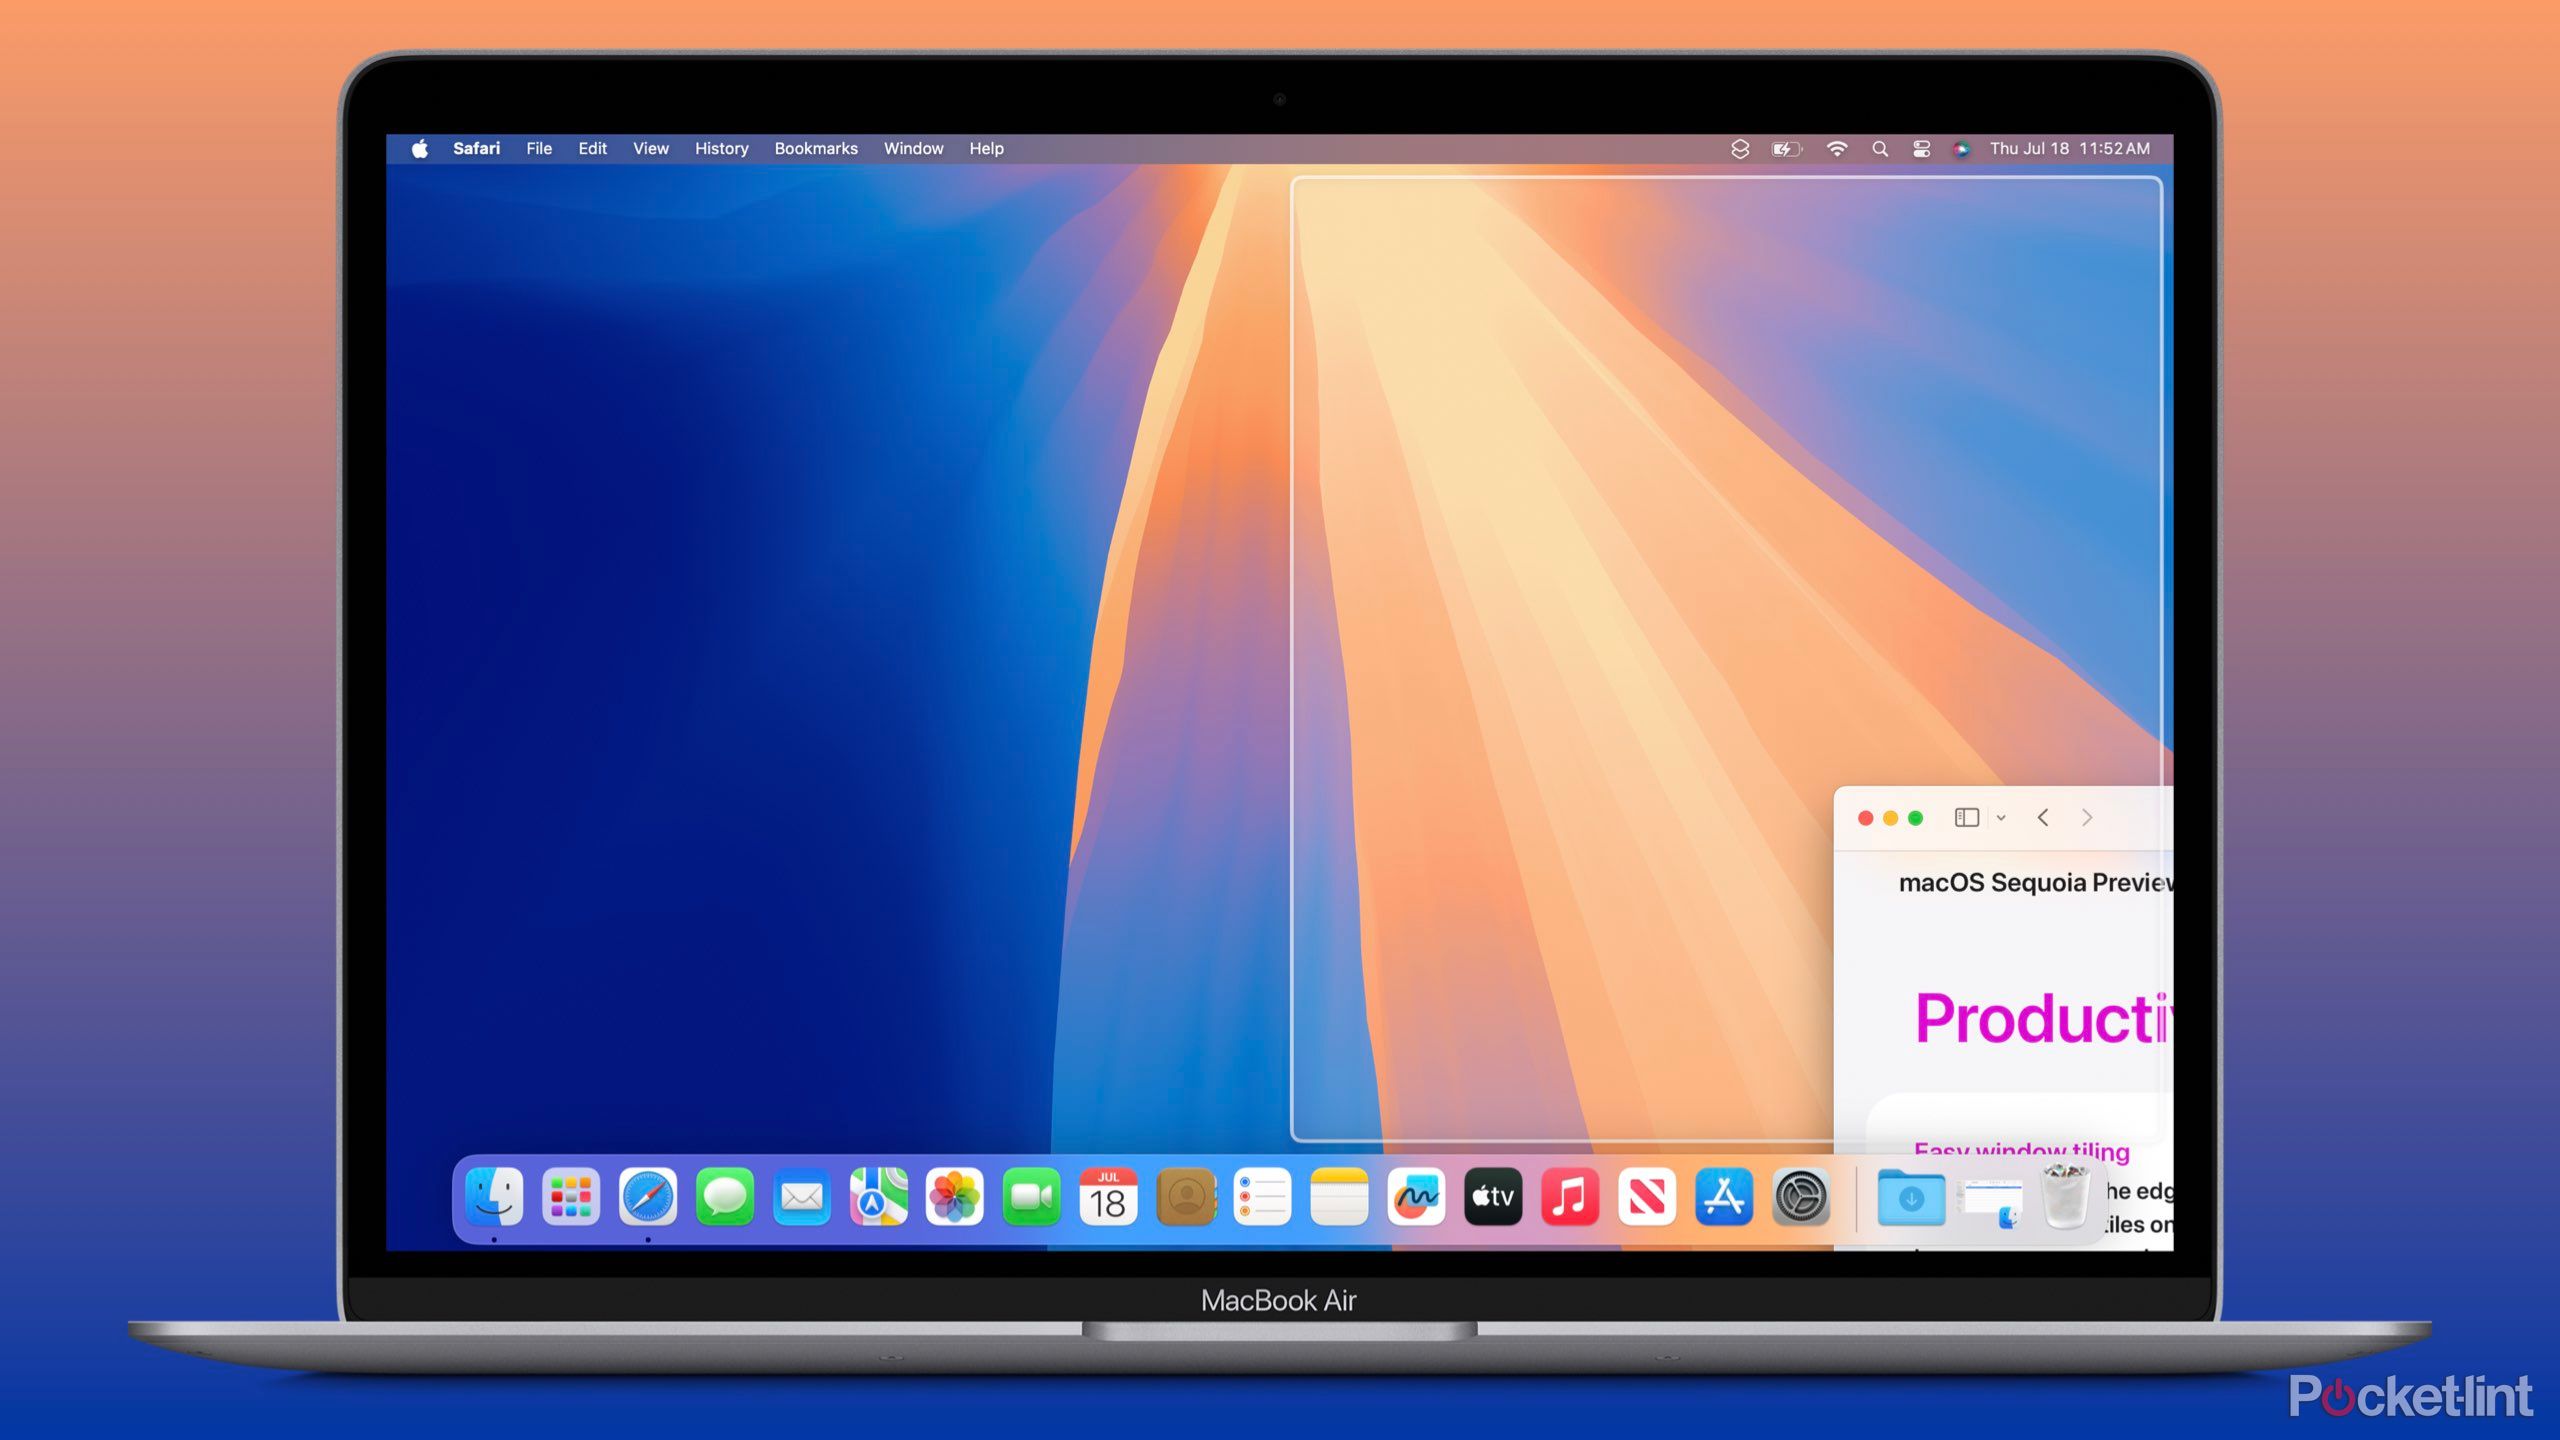
The second way to rearrange windows in macOS Sequoia is by selecting a window, holding down the option key, or dragging the window to the side of your display. There are three placements this method works with: left half, right half, and fill the entire display. Either drag your selected window to the left, right, or top of your display to resize the window or hold down the option key while dragging to activate the window tiling feature.
Releasing the window will resize it. You can turn off window tiling by dragging windows to the edge of the screen or holding down the option key by navigating to System Settings > Desktop & Dock > Scroll down to Windows > Toggle off one or both options.
Keyboard shortcuts
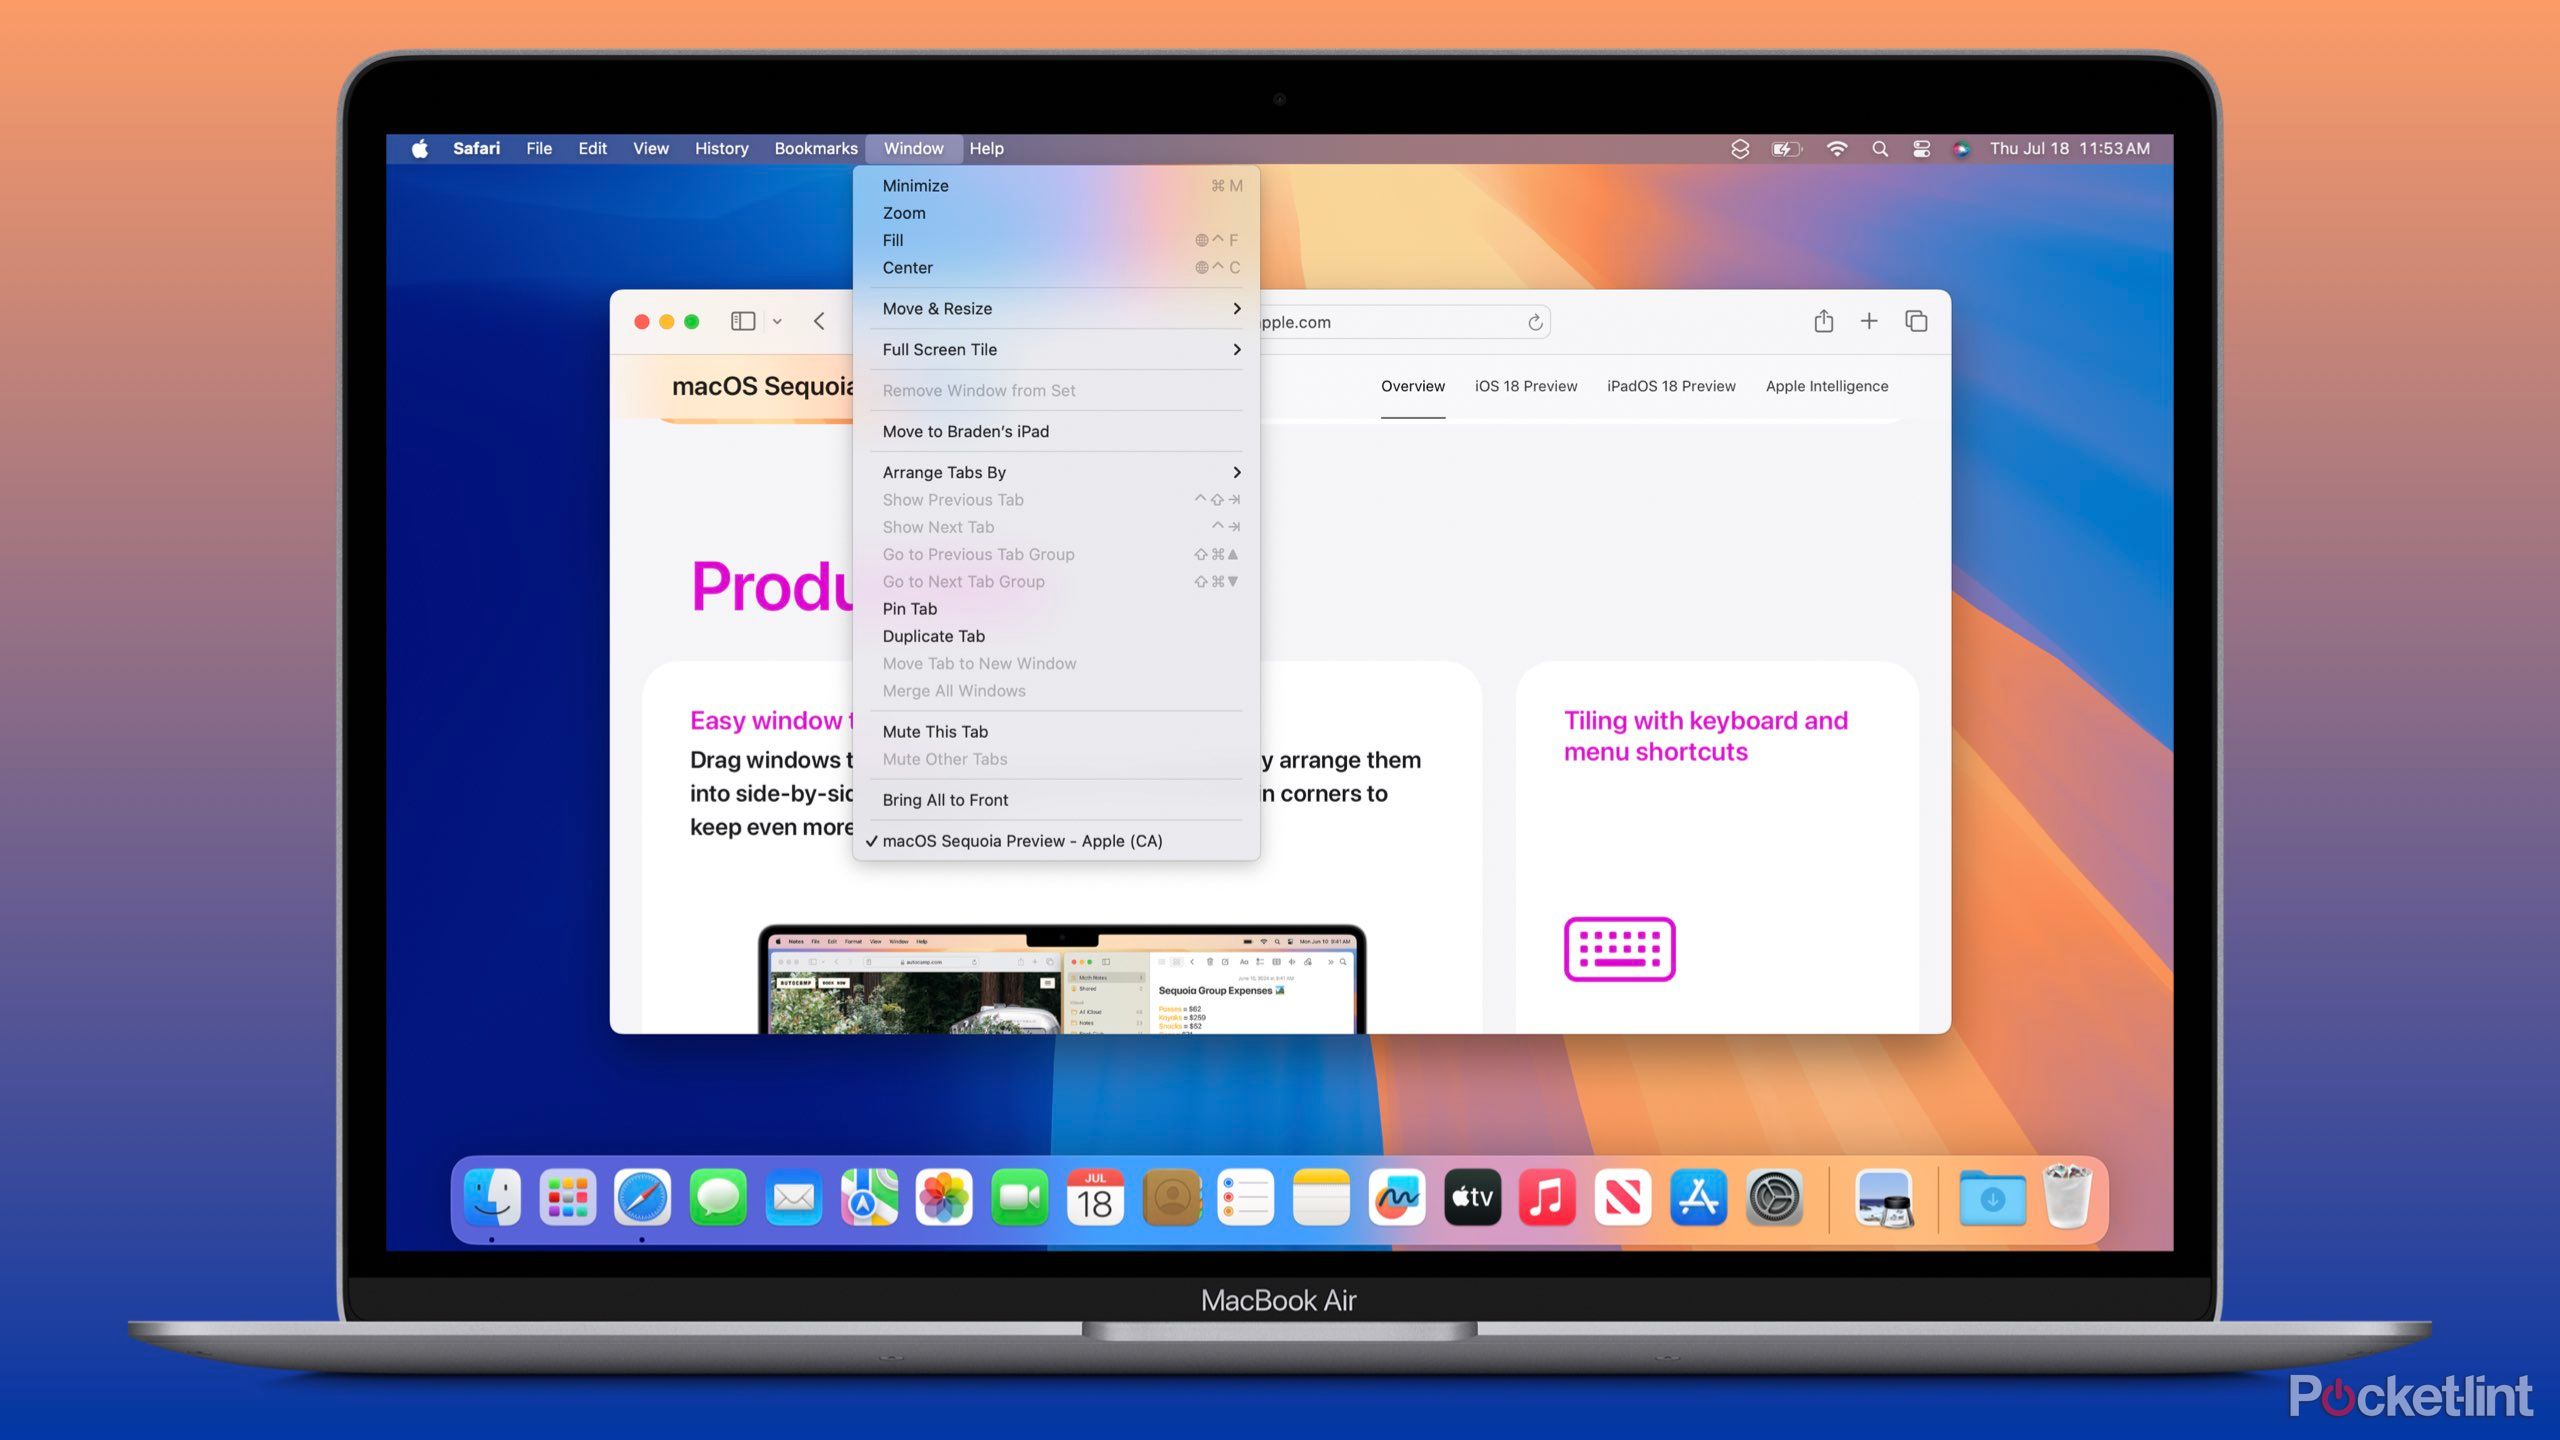
The third and final way to resize windows with window tiling is by using keyboard shortcuts. Keyboard shortcuts mean the selected window will resize by holding down a specific combination of keys. To easily see keyboard shortcuts available in macOS Sequoia, click Window in the menu bar. The available shortcuts show in a light grey to the right of your different options like Fill and Center. More options are under Move & Resize and Full Screen Tile. You can also select the option from the Window dropdown menu to resize the window.
These are the keyboard shortcuts available by default:
- Fill: fn+control+F
- Center: fn+control+C
- Left half: fn+control+left arrow key
- Right half: fn+control+right arrow key
- Top half: fn+control+top arrow key
- Bottom half: fn+control+bottom arrow key
- Arrange Left & Right: fn+control+Shift+left arrow key
- Arrange Right & Left: fn+control+Shift+right arrow key
- Arrange Top & Bottom: fn+control+Shift+top arrow key
- Arrange Bottom & Top: fn+control+Shift+bottom arrow key
Related
My 10 favorite iOS 18 features in Apple’s new public beta
Despite Apple Intelligence stealing the show at WWDC 2024, Apple’s first iOS 18 public beta includes several awesome new features.
How to create and customize window tiling keyboard shortcuts
It’s very easy
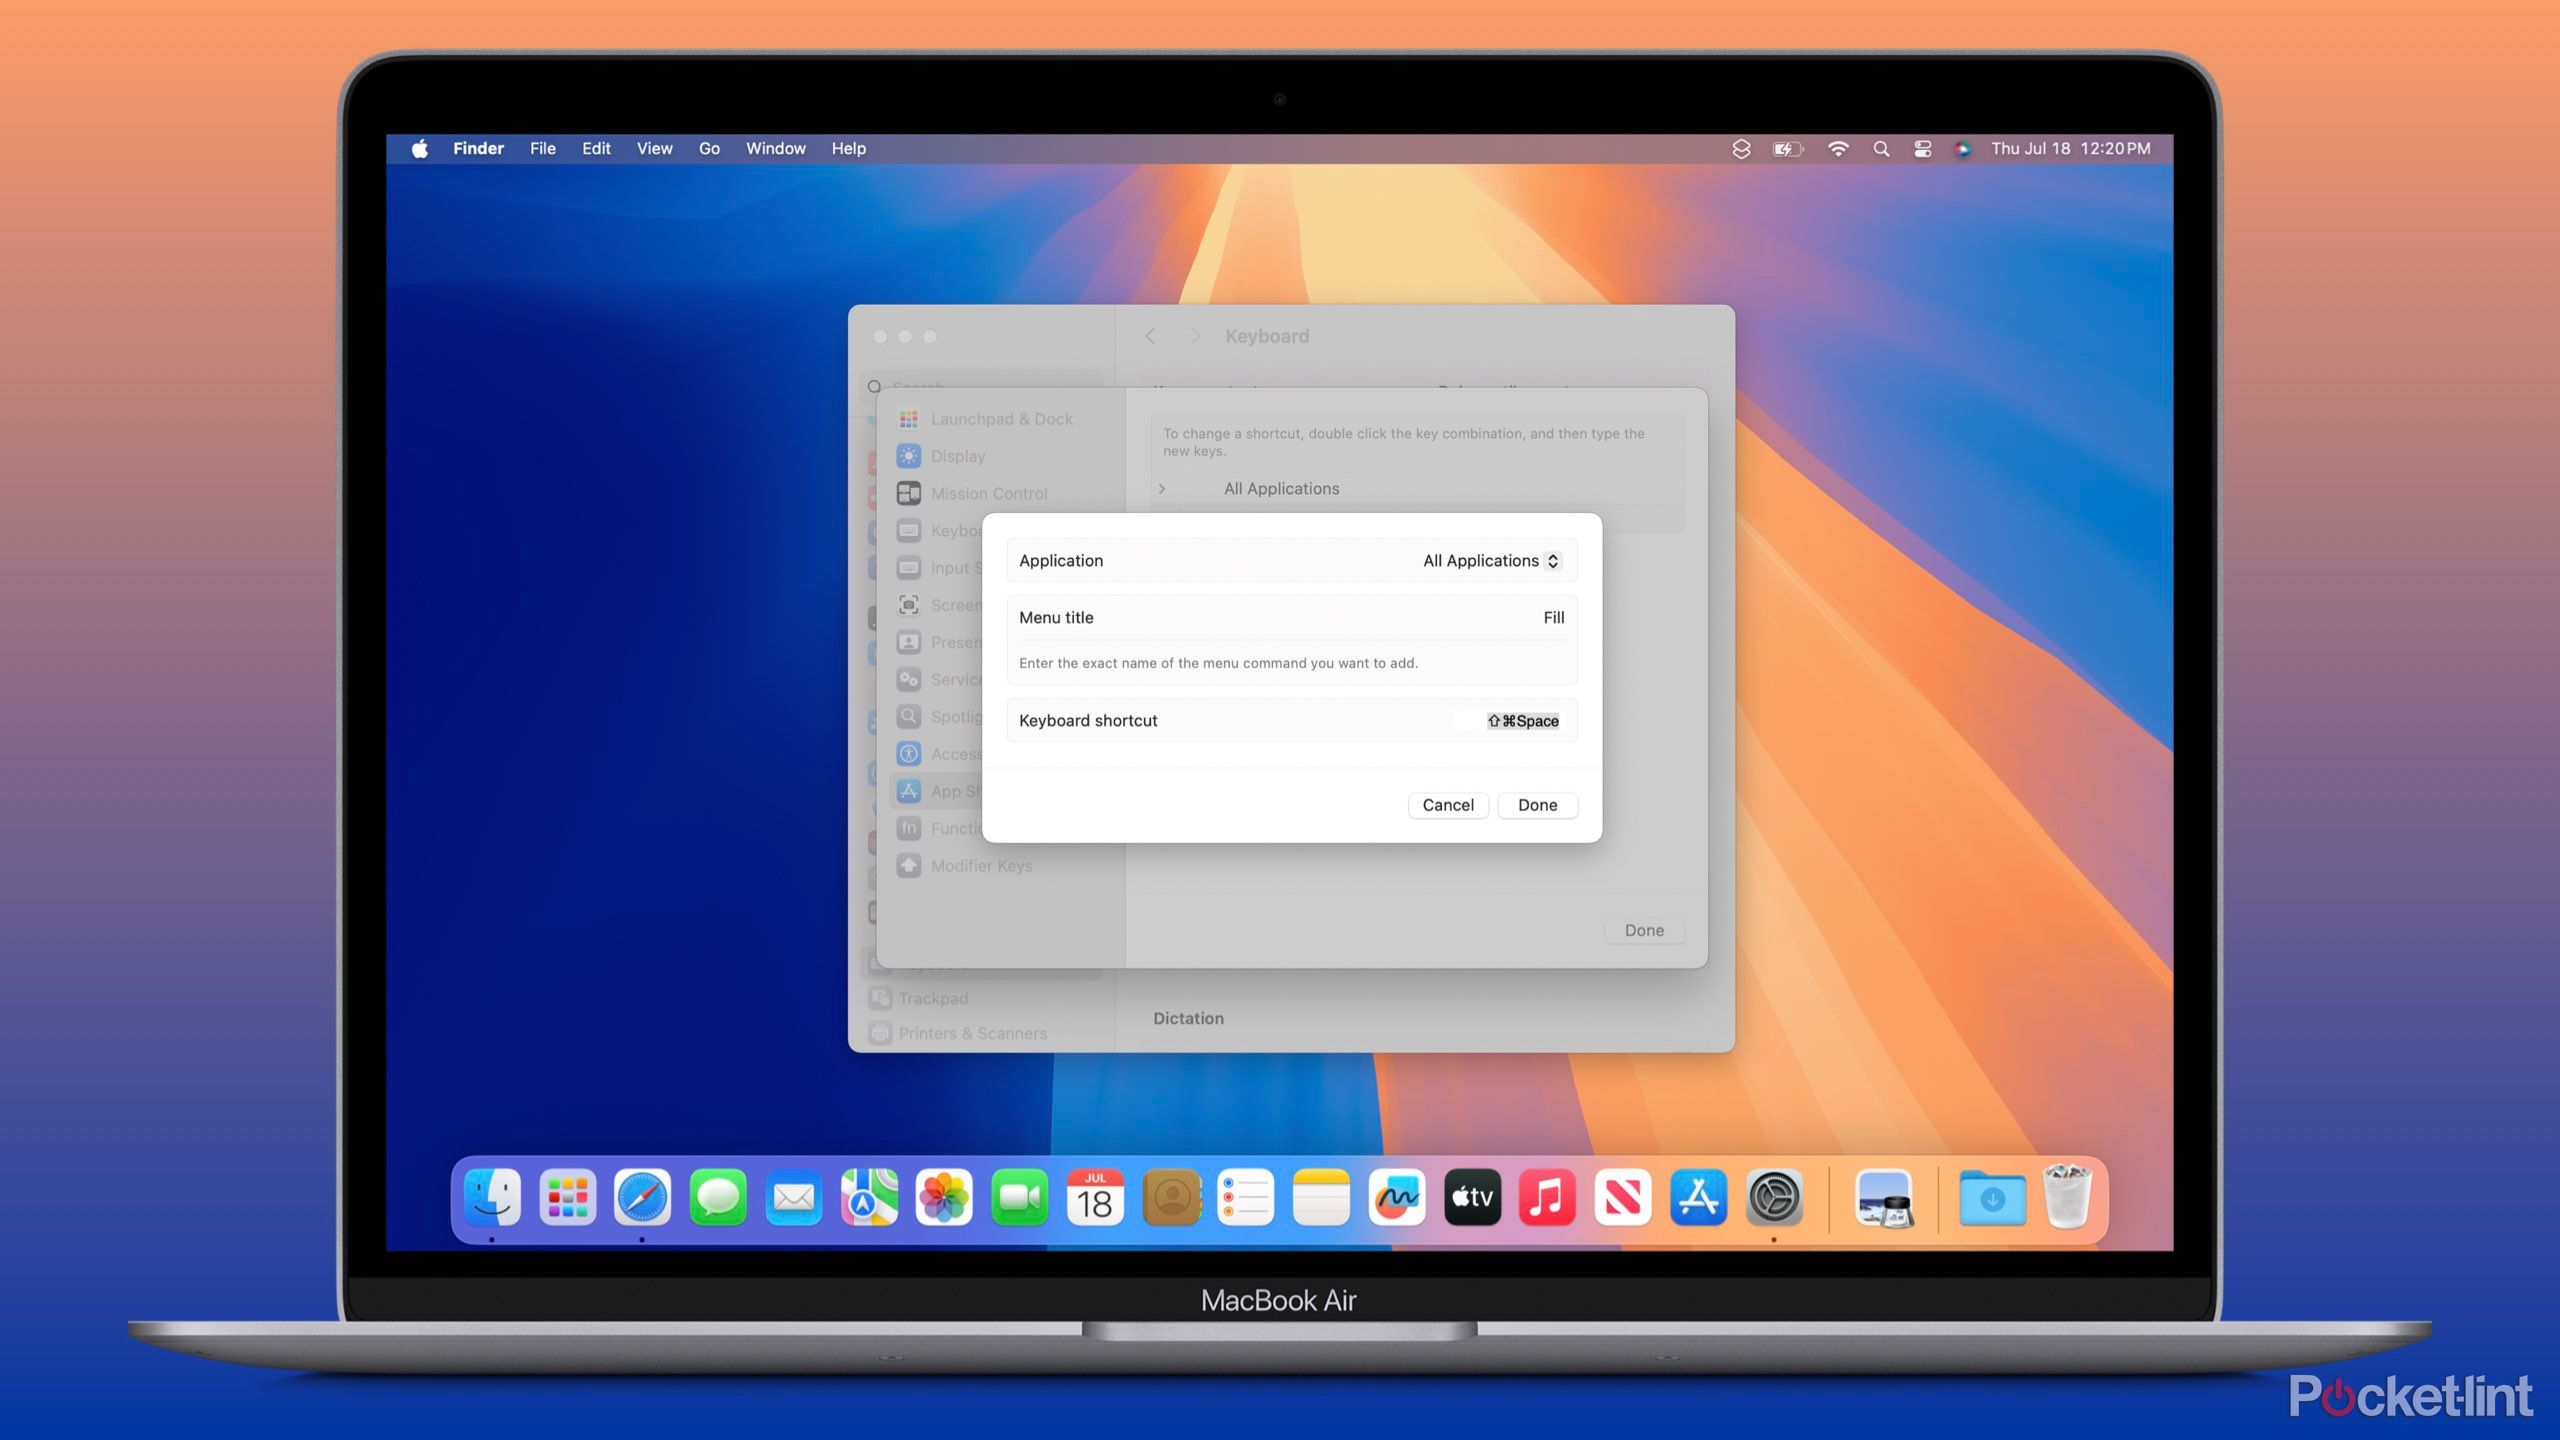
You may want to customize window tiling keyboard shortcuts to either match keyboard commands you currently use with a window management app, like Magnet, or to create more shortcuts for tiling options without one, like for each of the four quadrants. To create or customize a keyboard shortcut for window tiling, navigate to System Settings > Keyboard > Keyboard Shortcuts > App Shortcuts > press the plus (+) icon. Under Menu title, enter the name of the tiling action found under the Window menu in the menu bar.
For example, if you want to change the command for resizing an app to take up the entire screen, enter Fill. Alternatively, to create a shortcut for one or more quadrants, you’ll enter Top Left, Top Right, Bottom Left, or Bottom Right. Within Keyboard shortcut enter your keyboard command by holding down your selected keys. Remember, this shouldn’t be a shortcut used by any other macOS service. Otherwise, the shortcut will keep its default mapping for that command within particular apps. Click Done when finished. Repeat these actions for every shortcut you want to add or change. You may need to click the chevron to the left of All Applications to view your shortcuts.
One final pro tip. By default, windows have margins to provide a little space between them. Personally, I don’t care for the margins. To turn them off, navigate to System Settings > Desktop & Dock > Scroll down to Windows > Toggle off Titled windows have margins.

Related
5 games I’d like to see come to macOS Sequoia
Apple seems more determined than ever to make gaming on macOS a thing. Here are some games that could help that effort
Trending Products

Cooler Master MasterBox Q300L Micro-ATX Tower with Magnetic Design Dust Filter, Transparent Acrylic Side Panel…

ASUS TUF Gaming GT301 ZAKU II Edition ATX mid-Tower Compact case with Tempered Glass Side Panel, Honeycomb Front Panel…

ASUS TUF Gaming GT501 Mid-Tower Computer Case for up to EATX Motherboards with USB 3.0 Front Panel Cases GT501/GRY/WITH…

be quiet! Pure Base 500DX Black, Mid Tower ATX case, ARGB, 3 pre-installed Pure Wings 2, BGW37, tempered glass window

ASUS ROG Strix Helios GX601 White Edition RGB Mid-Tower Computer Case for ATX/EATX Motherboards with tempered glass…


